Published: Sep 27, 2020 by Adam Vincent
Connect an ASP.NET Application running on Azure Web Apps to Azure SQL and leave no messy secrets laying about in the web.config file, depending on Azure Key Vault, or have to orchestrate building a connection string with via Azure Resource Manager.
The purpose
Of course you should learn everything about managed identities, Azure SQL, Azure Active Directory and Azure Web Apps, but seriously sometimes we don’t have time to do all that reading and just need a quick-start. I’m providing a summary of just enough information to get it wired up but please do check out the relevant links. And here’s a link to the GitHub repo.
What is a managed identity?
Managed identities was previously referred to as Managed Service Identity (MSI). In summary, managed identities in Azure are an Azure Active Directory feature that allows Azure resources to authenticate to any azure service that supports managed identities. If you’d like to dig deeper, Microsoft Docs provide a great overview here.
Quick Start
Overview
- Provisioning Azure Resources
- Resource Group
- App Service Plan
- App Service
- Azure Sql Server
- Azure Sql Database
- Configuring Azure Resources
- Flip the App Service
Identityon - Add a Sql Server Admin
- Allow the App Service’s identity to access the Azure Sql Database
- Flip the App Service
- The ASP.NET Application
- Add dependencies to the application
- Configure the application
1. Provisioning Azure Resources
Just a bit of Powershell to get the resources up an running. The result will be:
| Resource | Name |
|---|---|
| Resource Group | ISBORKED919-RG |
| App Service Plan | ISBORKED919-ASP |
| App Service | isborked919 |
| Azure Sql Server | isborked919sql |
| Azure Sql Database | isborked919 |
These resources need to be globally unique! If you’d like to try this out on your own Azure Subscription, you may need to change
$appvariable.
# login
az login

# variables
$app = "isborked919"
$location = "eastus"
$sqlAdminUser = $app + "sqladmin"
$sqlAdminPass = "<generate a password>"

# create resrouce group
$group = (az group create -l $location -n ($app.ToUpper() + "-RG")|ConvertFrom-Json)

# create app service plan with the free tier
$plan = (az appservice plan create -g $group.name -l $location  -n ($app.ToUpper() + "-ASP") --sku FREE|ConvertFrom-Json)

# create app service
az webapp create -g $group.name -p $plan.name -n $app.ToLower()

# create the sql server
$server = (az sql server create -l $location -g $group.name -n ($app.ToLower() + "sql") -u $sqlAdminUser -p $sqlAdminPassword|ConvertFrom-Json)

# create the sql database
az sql db create -g $group.name -s $server.name -n $app
2. Configuring the Azure Resources
App Service
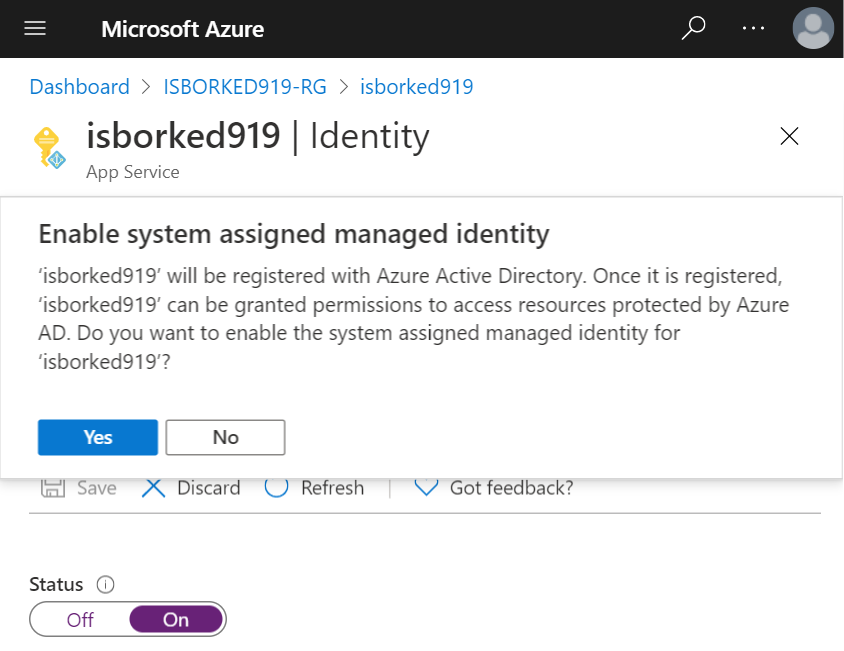
Navigate to the App Service and in the menu, we’re looking for the Identity blade. Flip the Status switch to ‘On’, click save and accept the dialog to register the managed identity on Azure Active Directory.

Sql Server
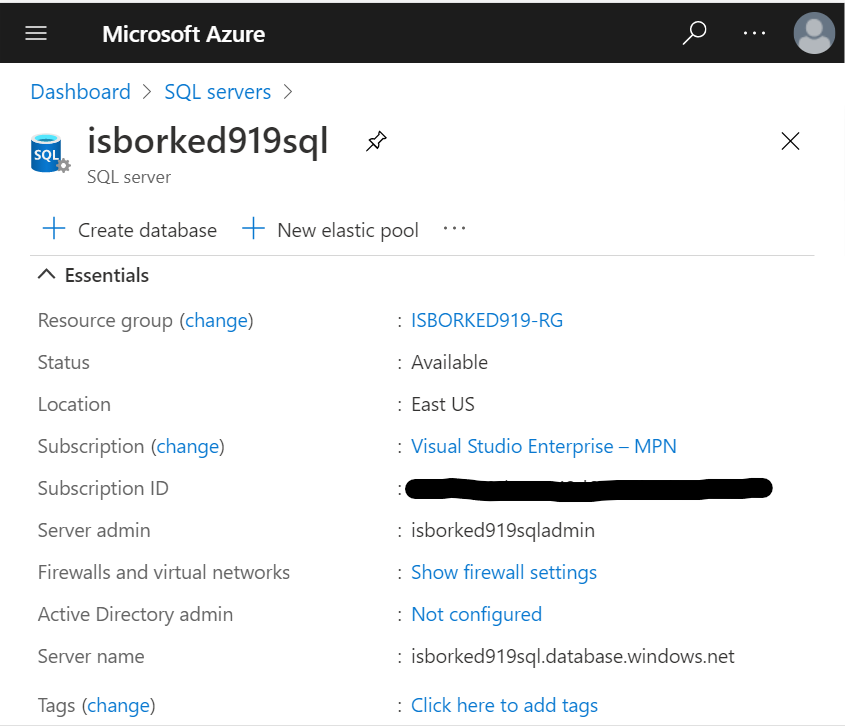
Enable Active Directory admin. In the overview, you’ll notice that the Active Directory admin is listed as not configured. Click on the Not configured link. Use the ‘Set Admin’ button to choose an existing Azure AD account that you will use as the Sql Server Admin.

Sql Database
There’s some instructions on how to set this up through the Azure Cloud Shell but I found it was simpler just to use Sql Server Management Studio (SSMS). We can connect to the database as the Azure Active Directory Admin by selecting the appropriate AD login method. I used Azure Active Directory - Universal with MFA because everyone should have MFA enabled.
On first attempt there will be a prompt to add our client IP address to the networking configuration of the SQL Server, since by default it is less secure without additional configuration, Azure locks access down by client IP address.
Once we’re connected to Azure SQL via SSMS, we can create a user for our app. When you open a new query editor the master table will be selected. Switch to our database name, in this case isborked919. We’ll issue the following command to create a user with a username that is the app service name.
CREATE USER [isborked919] FROM EXTERNAL PROVIDER;
Now, since we’re using Entity Framework and the application was scaffolded as code first, EF needs to be able to create tables so we’ll simply assign the new user to the db_owner role.
EXEC sp_addrolemember 'db_owner', 'isborked919';
Now our web app’s managed identity is mapped to the Azure SQL database. On to the application.
3. The Application
The application is nothing special. It’s slightly less useful than a todo app. You can clone it and try it yourself, or just look at the important bits in the web.config file.
It has one model, and an associated Controller and an Entity Framework DbContext
The key (see what I did there?) takeaway is that in the web.config file where the application gets the connection string from, doesn’t have a password in it. When this application is running on the App Service, it will use the app service’s managed identity to authenticate to Azure Sql.
<connectionStrings>
   <add name="BorkContext" connectionString="Server=tcp:isborked.database.windows.net,1433;database=ISBORKED;UID=ISBORKED;Authentication=Active Directory Interactive" providerName="System.Data.SqlClient" />
</connectionStrings>
Add dependencies to the application
To get this to all work together, we’ll need something that knows how to interact with Azure Active Directory. For ASP.NET this is pretty simple because all we need is a Nuget package from the Azure SDK.
Install-Package Install-Package Microsoft.Azure.Services.AppAuthentication -Version 1.5.0
To use this package, we’ll need to add it to our web.config. First we’ll provide a <configSection> to let the System.Data.SqlClient know that we want it to use a specific authentication provider, and then plug in the assembly as a provider.
Entity Framework uses
System.Data.SqlClientwhen communicating to Sql Server, however it can be configured to use other providers like Oracle, Sql Lite, Postgres, etc.
<configSections>
   <!-- Let SqlClient know that we're specifying an authentication provider -->
   <section name="SqlAuthenticationProviders" type="System.Data.SqlClient.SqlAuthenticationProviderConfigurationSection, System.Data, Version=4.0.0.0, Culture=neutral, PublicKeyToken=b77a5c561934e089" />
</configSections>

And again, plug in the `AppAuthentication` assembly in as an authentication provider
```xml
<SqlAuthenticationProviders>
   <providers>
      <add name="Active Directory Interactive" type="Microsoft.Azure.Services.AppAuthentication.SqlAppAuthenticationProvider, Microsoft.Azure.Services.AppAuthentication" />
   </providers>
</SqlAuthenticationProviders>
Happy hacking!
Resources:
- https://docs.microsoft.com/en-us/azure/azure-sql/database/authentication-aad-overview
- https://docs.microsoft.com/en-us/azure/active-directory/managed-identities-azure-resources/tutorial-windows-vm-access-sql
- https://github.com/EntityAdam/AspNetEfAzureSql/tree/master/AspNetEfAzureSql